True NB-IoT board ส่งข้อมูลไป InfluxDB ด้วย UDP
ในการทำ IoT (Internet of Things) แน่นอนว่าสิ่งที่จะขาดไปไม่ได้ก็คือการสื่อสารกันระหว่างอุปกรณ์ต่างๆ ในระบบ ซึ่ง NB-IoT หรือ Narrowband IoT ก็เป็นเครื่อข่ายสื่อสารรูปแบบหนึ่งที่น่าสนใจ เพราะใช้พลังงานน้อยและใช้เครือข่ายเดียวกับเซลลูลาร์ทำให้สามารถสื่อสารได้ในระยะไกล ในไทยมีเปิดตัวมาสองเจ้าคือ AIS กับ True ซึ่งของ True เราเพิ่งได้บอร์ดมาถึงมือ มาลองดูกันว่ายังไง
เปิดกล่องมาก็จะประกอบไปด้วย
- True NB-IoT Arduino Shield
- Antenna
- NB-IoT Sim (อยู่ใน socket sim ที่ติดมากับบอร์ด Shield แล้ว)
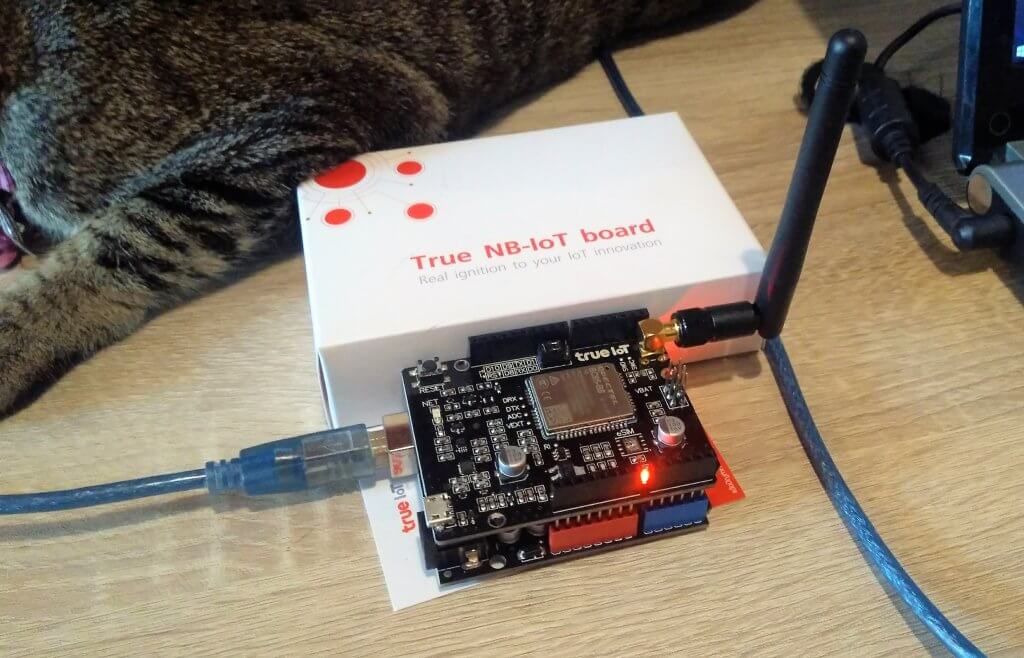
True NB-IoT Arduino Sheild with Arduino Uno

True NB-Iot Module หน้าตาด้านทีมี socket ใส่ซิมการ์ด มีสติ๊กเกอร์ void แปะทับ
บอร์ดใช้โมดูล Quectel BC95-B8 ความถี่ 900 Hz ในระบบเครือข่าย LTE Cat. NB1 (NB-IoT) รองรับโปรโตคอล UDP, CoAP การส่งข้อมูล Single tone, Downlink 24kbps, Uplink 15.625 kbps สเปกอื่นๆลองไปหาดู 1 , 2
บอร์ดมีพอร์ต micro USB มาให้เราสามารถต่อกับ PC เพื่อใช้ USB Serial Port ลองใช้คำสั่ง AT command
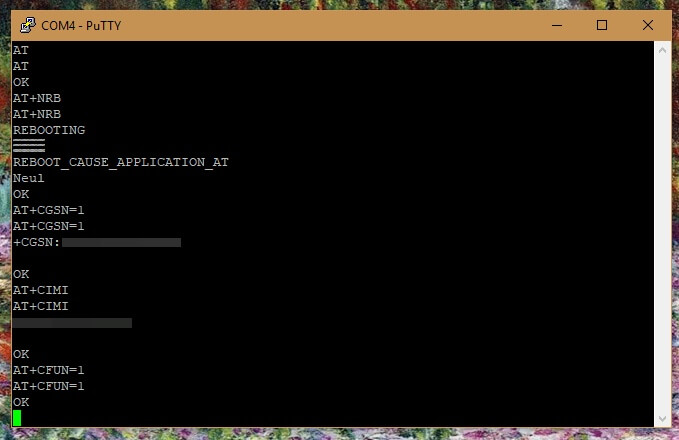
ใช้สาย USB เชื่อมต่อโมดูลกับ PC และใช้ AT Command
มีไลบรารีที่ True ลงใน github ซึ่งรองรับการใช้งานกับ Arduino Uno ใน Arduino IDE ต้อง Include Library ด้วยการ Add .Zip library (มีในเอกสารการใช้งาน) มีตัวอย่างโค้ดและการใช้งานโดยการส่งข้อมูลไปยัง IoTtweet และ ThingsBoard
ทีนี้สิ่งที่เราจะทำในบทความนี้ก็คือ ส่งข้อมูลจาก sensor ไปยัง InfluxDB ผ่านโปรโตคอล UDP
สิ่งที่ต้องเตรียม
- True NB-IoT Sheild
- Arduino UNO R3
- USB Cable A to B
- GPS Module Ublox NEO-6M
- Temprature&Humidity Module DHT22/AM2302
- Bread Board
- Jumper Wires Male-to-Male and Male-to-Female
การต่ออุปกรณ์
เอาโมดูล NB-IoT เสียบกับ Arduino Uno R3 โดย pin ของโมดูล NB-IoT จะตรงกับ Arduino
DHT22/AM2302 Module ขา + ต่อกับ pin 5V , ขา – ต่อกับ GND ส่วนขา out ต่อกับ pin 2 ของ Arduino
GPS Module ขา VCC ต่อกับ 5V , ขา GND ต่อกับ GND , RX ต่อกับ pin 3 และ TX ต่อกับ pin 4
ต่อ Arduino กับ PC ผ่าน USB Cable A to B
เมื่อต่อเสร็จแล้วจะได้ประมาณในภาพ
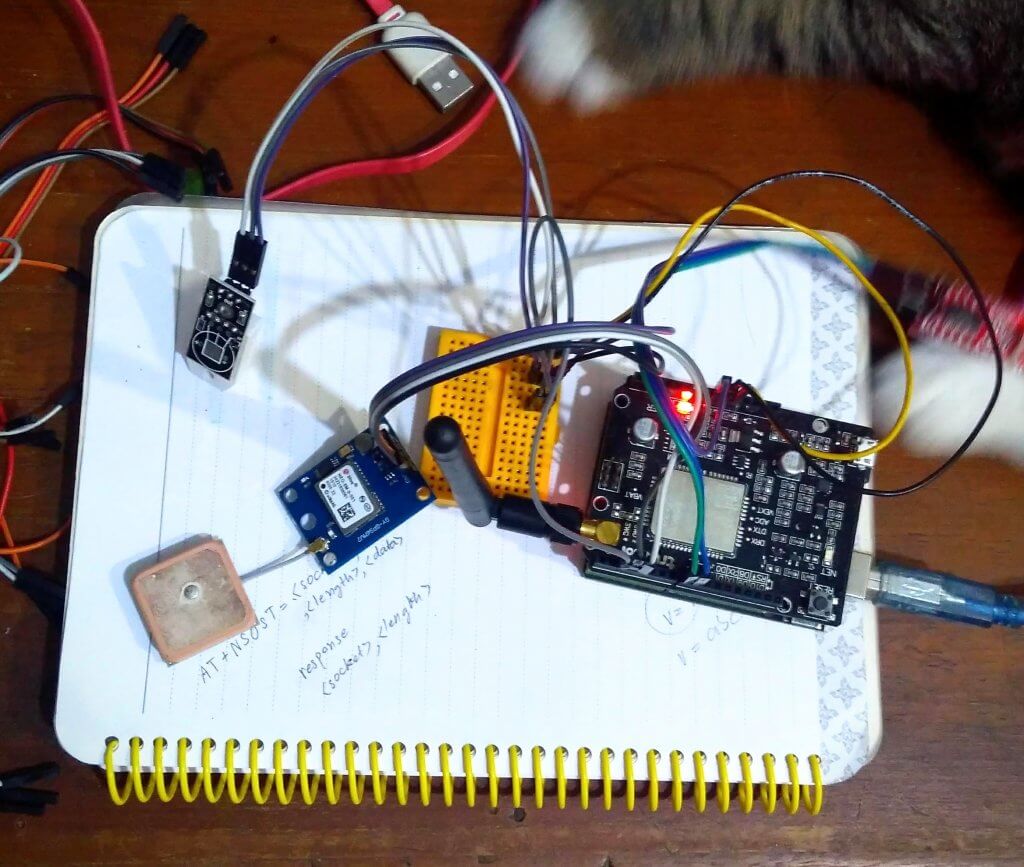
Arduino with NB-IoT sheild , DHT22 Module, GPS Module
เตรียม InfluxDB กับ Grafana Dashboard
เราใช้ InfluxDB สำหรับเก็บข้อมูลที่ส่งมาจากอุปกรณ์ผ่าน UDP และ monitor ข้อมูลด้วย Grafana Dashbaord พอดีเราติดตั้งไว้ใช้งานอยู่แล้ว มีเวลาจะเขียน Tutorial ติดตั้ง InfluxDB กับ Grafana นะคะ ถ้าจะลองใช้งานลองเสิร์ชวิธีติดตั้งดู อันที่จริงการส่งด้วย UDP ถ้ามี client อื่นที่สามารถรองรับ protocol แบบ UDP ได้ก็ใช้ได้นะคะ
ในส่วนของบทความนี้ InfluxDB ต้องไปเปิดส่วนที่เป็น UDP listener เสียก่อน โดยเข้าไปแก้ไขที่ไฟล์ influxdb.conf (เราติดตั้งใน Ubuntu 16.04 ไฟล์อยู่ที่ /etc/influxdb/influxdb.conf)
ตัวอย่างการแก้ไข influxdb.conf เพื่อเปิด UDP listener
1 2 3 4 5 6 7 8 9 10 11 | # influxdb.conf ... [[udp]] enabled = true bind-address = ":8889" # the bind address database = "true_nbiot_test" # Name of the database that will be written to batch-size = 5000 # will flush if this many points get buffered batch-timeout = "1s" # will flush at least this often even if the batch-size is not reached batch-pending = 10 # number of batches that may be pending in memory read-buffer = 0 # UDP read buffer, 0 means to use OS default ... |
Arduino Code
*** เราใช้ PlatformIO ใน VS Code IDE ดูวิธีติดตั้งและใช้งานเบื้องต้นในบทความนี้ ***
ส่วนของการอ่านค่า GPS
เราใช้ TinyGPS++ library ใช้กับ SoftwareSerial library
1 2 3 4 5 6 7 8 | #include <TinyGPS++.h> // Include the TinyGPS++ library TinyGPSPlus tinyGPS; // Create a TinyGPSPlus object #include <SoftwareSerial.h> // Include SoftwareSerial library for GPS static const int RXPin = 4, TXPin = 3; // GPS TX, Arduino RX pin GPS RX, Arduino TX pin static const uint32_t GPSBaud = 9600; // GPS module baud rate. GP3906 defaults to 9600. SoftwareSerial ssGPS(RXPin, TXPin); // Create a SoftwareSerial |
สร้าง function getGPSinfo() ขึ้นมาสำหรับอ่านค่า GPS แล้วเรียก function gpsHash() เพื่อแปลงค่า latitude และ longitude ที่ได้จาก GPS เป็น Geohash ด้วย ที่เราอยากได้ค่าพิกัดที่เป็นรูปแบบ Geohash ก็เพราะจะได้ plot ในแผนที่ใน Grafana ได้สะดวกๆ ก็เลยเอา libgeohash มาใช้ แต่เป็น lib ภาษา c ดัดแปลงเล็กน้อย แล้วเอามาวางใน folder lib ของโปรเจกต์
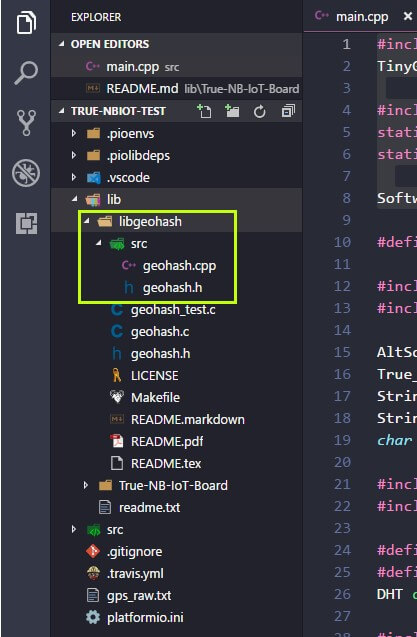
ส่วนการอ่านค่า DHT22/AM2302
เราใช้ DHT library ของ Adafruit (อันที่จริงจะใช้อะไรก็ตามสะดวกค่ะ)
1 2 3 4 5 6 | #include <Adafruit_Sensor.h> #include <DHT.h> #define DHTPIN 2 #define DHTTYPE DHT22 DHT dht(DHTPIN, DHTTYPE); |
ส่วน NB-IoT กับการส่งค่าด้วย UDP
เราใช้ไลบรารีที่ทรูทำไว้ แต่เนื่องจากเราเขียนใน PlatformIO แล้วค้นไลบรารีของทรูใน Library Manager ไม่เจอก็เลยต้อง download จาก github แล้ว extract ไลบรารีมาใส่ไว้ในโฟลเดอร์ lib ของโปรเจกต์

ไลบรารีของทรูใช้งานกับ AltSoftSerial
1 2 3 4 5 6 7 8 | #include <True_NB_bc95.h> // Include NB-IoT Module library #include <AltSoftSerial.h> // Include AltSoftSerial library for NB-IoT Module AltSoftSerial asSerial; // Create a AltSoftSerial object True_NB_bc95 bc95; // Create a True_NB_bc95 object String db_host="xx.xx.xx.xx"; // IP UDP Host String db_port="8889"; // UDP Port char sock[] = "0\0"; |
การส่ง UDP จะเรียกใช้ sendUDPstr(db_host,db_port,data) db_host เป็น ip address ของ InfluxDB , db_port เป็น port ที่เราเปิดไว้สำหรับ UDP listener ในหัวข้อก่อนั่นเอง โดยรูปแบบของ data ที่ส่งไปจะเป็น
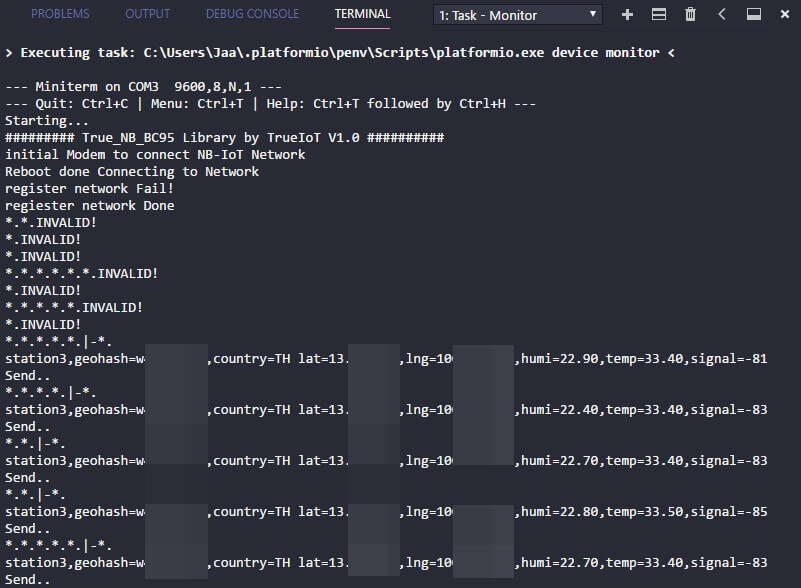
station3,geohash=wxxxxxxxxe,country=TH lat=xx.xxxxxx,lng=xxx.xxxxxxx,humi=22.80,temp=33.40,signal=-81
station3 เป็น measurement
geohash,country เป็น tag key จากในตัวอย่าง เช่น geohash คือ tag key, wxxxxxxxxe คือ tag value
lat, lng, humi, temp, signal รูปแบบเป็น field key จากในตัวอย่าง เช่น humi คือ field key, 22.80 คือ field value
ดูรายละเอียดรูปแบบการเขียน data ใน InfluxDB ได้ตามนี้ https://docs.influxdata.com/influxdb/v1.5/guides/writing_data/
เนื่องจากเราใช้ Arduino UNO serial ที่มีให้ใช้ก็จะจำกัดจำเขี่ยเหลือเกินเวลาส่งก็เลยต้องปิด serial ของ gps เมื่อเรียกใช้เสร็จก่อนจะส่ง UDP ไม่อย่างนั้น Uno ทำงานไม่ทัน ถ้าใช้บอร์ดอื่นที่มี serial ให้ใช้มากกว่านี้ก็จะไม่ต้องเหนื่อยเรื่องจัดการทรัพยากรที่จำกัดมากนัก
ตัวอย่างโค้ดทั้งหมด
1 2 3 4 5 6 7 8 9 10 11 12 13 14 15 16 17 18 19 20 21 22 23 24 25 26 27 28 29 30 31 32 33 34 35 36 37 38 39 40 41 42 43 44 45 46 47 48 49 50 51 52 53 54 55 56 57 58 59 60 61 62 63 64 65 66 67 68 69 70 71 72 73 74 75 76 77 78 79 80 81 82 83 84 85 86 87 88 89 90 91 92 93 94 95 96 97 98 99 100 101 102 103 104 105 106 107 108 109 110 111 112 113 114 115 116 117 118 | #include <TinyGPS++.h> // Include the TinyGPS++ library TinyGPSPlus tinyGPS; // Create a TinyGPSPlus object #include <SoftwareSerial.h> // Include SoftwareSerial library for GPS static const int RXPin = 4, TXPin = 3; // GPS TX, Arduino RX pin GPS RX, Arduino TX pin static const uint32_t GPSBaud = 9600; // GPS module baud rate. GP3906 defaults to 9600. SoftwareSerial ssGPS(RXPin, TXPin); // Create a SoftwareSerial #define SerialMonitor Serial // Define the serial monitor port. #include <True_NB_bc95.h> // Include NB-IoT Module library #include <AltSoftSerial.h> // Include AltSoftSerial library for NB-IoT Module AltSoftSerial asSerial; // Create a AltSoftSerial object True_NB_bc95 bc95; // Create a True_NB_bc95 object String db_host="xx.xx.xx.xx"; // IP UDP Host String db_port="xxxx"; // UDP Port char sock[] = "0\0"; #include <Adafruit_Sensor.h> #include <DHT.h> #define DHTPIN 2 #define DHTTYPE DHT22 DHT dht(DHTPIN, DHTTYPE); #include <geohash.h> void getGPSInfo(); void getDHT(); void gpsHash(); String lat,lng,humi,temp,ghash,ss,data; uint8_t dataValid = 0; void setup() { Serial.begin(9600); asSerial.begin(9600); Serial.println("Starting..."); delay(3000); bc95.init(asSerial); bc95.initModem(); delay(1000); while (!bc95.register_network()); bc95.create_UDP_socket(4587, sock); delay(1000); } void loop() { getGPSInfo(); getDHT(); if (dataValid == 1){ ss = String(bc95.check_modem_signal()); data= String("station3,geohash="+ ghash + ",country=TH lat="+ lat + ",lng=" + lng + ",humi="+ humi + ",temp=" + temp + ",signal=" + ss); Serial.println('.'); Serial.println(data); Serial.println("Send.."); bc95.sendUDPstr(db_host,db_port,data); dataValid = 0; }else{ Serial.print('.'); } delay(1000); } void getGPSInfo() { ssGPS.begin(GPSBaud); dataValid = 0; while (ssGPS.available() > 0){ if (tinyGPS.encode(ssGPS.read())){ if(tinyGPS.location.isValid()){ Serial.print('|'); lat = String(tinyGPS.location.lat(), 6); lng = String(tinyGPS.location.lng(), 6); gpsHash(); dataValid = 1; ssGPS.end(); } else { Serial.println(F("INVALID!")); dataValid = 0; //ssGPS.end(); } } } } void getDHT() { humi = String(dht.readHumidity(),2); temp = String(dht.readTemperature(),2); if (!humi.length()||!temp.length()) { Serial.println("Failed to read from DHT sensor!"); }else{ Serial.print('*'); } } void gpsHash() { char* gpshash = geohash_encode(lat.toDouble(), lng.toDouble(), 9); ghash = String(gpshash); if(!ghash.length()) { Serial.println("geoHash somthing wrong!"); }else{ Serial.print('-'); } } |
ทำการ Build และ Upload ไปยังบอร์ด แล้ว serial monitor ดูจะประมาณนี้
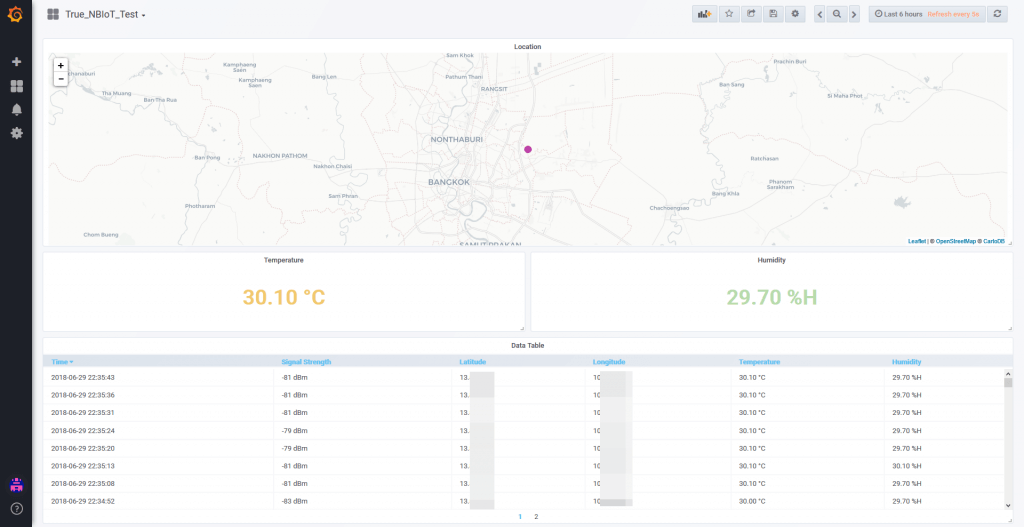
หน้าตาการ Monitor ใน Grafana Dashboard ที่ดึงข้อมูลมาจาก InfluxDB
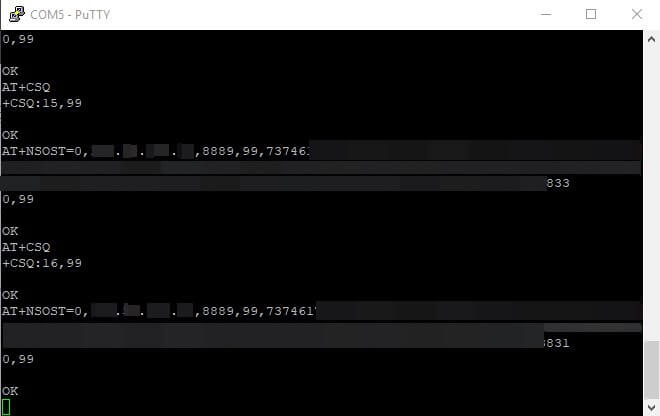
เราลองต่อ USB to serial เพื่อ monitor ดูคำส่ง AT-command ถ้าส่งสำเร็จจะหน้าตาประมาณนี้ โดยคำสั่ง AT+CSQ คือการอ่านค่าความแรงของสัญญาณ และ AT+NSOST คือคำสั่งส่งค่าไปยัง InfluxDB ด้วย UDP ดูคู่มือคำสั่ง AT Commands ได้ที่นี่
References
True-NB-IoT-Board library https://github.com/trueiot/True-NB-IoT-Board
True NB-IoT board (NB-IoT Shield for Arduino) Shop http://www.wemall.com/products/true-nb-iot-board-nb-iot-shield-for-arduino-2377959073560.html
InfluxDB UDP protocal https://docs.influxdata.com/influxdb/v1.5/supported_protocols/udp/
Using InfluxDB in Grafana http://docs.grafana.org/features/datasources/influxdb/
Geohash http://geohash.org/site/tips.html#format
Geohash Library https://github.com/simplegeo/libgeohash
Quectel BC95 AT Commands Manual https://www.quectel.com/UploadImage/Downlad/Quectel_BC95_AT_Commands_Manual_V1.9.pdf
